Requirements
Polaris Leap runs on desktops, notebooks, and tablets with the requirements listed below. Leap is not designed to operate on cell phones.
Note:
The procedures in the Leap documentation use click as the input action (click with the mouse button), but if you are using Leap on a device with a touch screen, the input action is tap (tap on the screen).
Operating Systems / Web Browsers
- The web browser must support HTML 5.
- Windows 7/8/8.1 (includes Surface tablets)
- Microsoft Internet Explorer 10/11
- Google Chrome v36+
- OS X (recommend Mavericks 10.9 / Mountain Lion 10.8)
- Safari 7+
- Google Chrome v36+
- iOS v7+ (iPad 3rd gen+, not phones)
- Safari 6+
- Chrome v36+
Polaris ILS Version
Polaris Integrated Library System version 5.6.
Important:
Recently-implemented functionality in Polaris may not be available for this version of Leap.
Camera for Patron Photographs
The camera is available to take patron photographs for the following:
- Windows 7/8/8.1 (desktop and Surface Pro only)
- Google Chrome v36+
- OS X
- iOS v7+
- Safari 6+
Note:
When using Chrome, you must choose the Allow button in the address bar to permit Leap to use the camera.

You can choose the camera icon in the address bar to view additional options, such as selecting the camera.
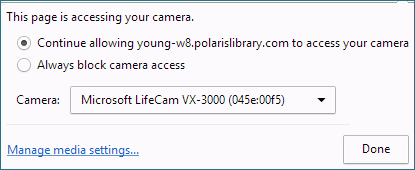
While in Chrome, go to chrome://settings/contentExceptions#media-stream to manage media settings.
Integrated RFID and Internet Explorer 10 or 11
If you access Leap through Internet Explorer (IE) 10 or 11, and you use Security Manager for integrated RFID, the Leap web site must be in Internet Explorer's Trusted Sites list. This is because the Leap website is typically in IE's Internet Zone, while Security Manager is in IE's Intranet Zone and IE does not allow Internet and Intranet zones to connect with one another.
To solve this issue, allow the Leap website to access data sources across domains:
- Log into Leap.
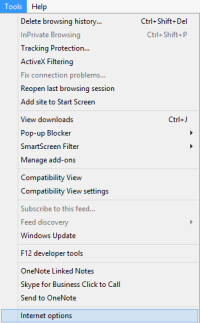
- Click Tools on Internet Explorer's menu.
- Click Internet options.
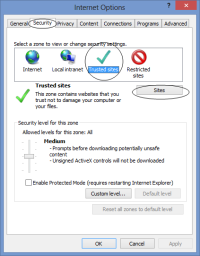
The Internet Options dialog box opens.
- On the Internet Options dialog box, click the Security tab.
- On the Security tab, click the Trusted Site zone icon.
- Click the Sites button.
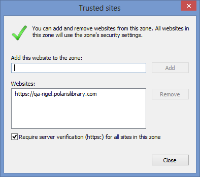
The Trusted sites dialog box opens with the Leap website in the Add this website to the zone box.
- Click Add.
The Leap URL is added to the Websites list.
- Click Close to return to the Security Tab.
- On the Security Tab for Trusted Sites, click the Custom level… button.
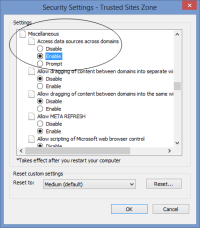
The Security Settings - Trusted Sites Zone dialog box opens.
- Scroll down to the Miscellaneous node.
- Under Access data source across domains, click Enable.
- Select OK to close the Security Settings - Trusted Sites Zone dialog box.
- Select Apply to apply your changes.
- Select OK to close the Internet Options dialog.